|
Has |
Did you come here from a link on another website? See page bottom for latest version of this page.
"Do you know how many ways there are to make a ski turn?", asked the wag.
His torso is not over his feet! Is he about to fall?
Skier Types: A ski instructor once classified skiers into 4 types, the first three types grading from one to the other as skills advance:
Traverse and Position of Power: Skis are slippery. When we stand on a ski slope, in order to keep from sliding where we don't want to go, we tilt our skis up so their uphill edges bite into the snow; this gives us a grip on our position. To tilt the skis still more, we must tilt our feet to the side (and therefore our lower legs and perhaps even move our upper body parts the opposite way to stay in balance). When moving and tilting the skis, to keep from falling over, we must tilt the body still more and/or bend at the waist to bring the upper body back over the lower part. A little fore-aft twist at the waist with the downhill body parts trailing the upper ones helps us make this bend, being anatomically stronger, and results in the downhill ski being back a bit from the uphill. This position has been called the Traverse, and it is effective when sliding across a slope. It has also been called the Comma, for that is the shape the body gets itself into, not because there is a pause in the maneuver as there would be in a sentence. The same position develops by the end of a ski turn. It lines up the body in the strongest way to manage the excess forces that develop at that moment. This position near the end of a more forceful turn is sometimes called the Position of Power. The ski's edges rise to an increasingly high angle as the turn finishes, thereby increasing control.. Crossover: The Position of Power is a great way to finish a ski turn--especially on steeper hills or to control speed, but it does not start a ski turn. To start the skis turning a new direction, we must get out of the Position of Power and tilt the skis over onto their other edges. Imagine tilting the skis from one set of edges (the uphill pair) to the other set (the downhill pair). To do so, we must move our bodies from one side of the skis to the other, a move called the "crossover". If done standing still without poles to support you, you will almost surely fall over; the move can only be done while moving so that forces have developed to hold you up. Because of this the crossover is probably the hardest move to learn in skiing. Yet the crossover is the heart of modern skiing. It should be learned right from the first lesson! In the middle of the crossover, we have two options: We can keep the ski moving across from one set of the edges to the other, and with sufficient finesse we will put the skis in a position where they increasingly bend into a bow that will turn them and us. Or when the skis are flat to the snow (both flat at once, please), we can twist them with our legs by rotating the thighs within the hips (that "braquage" word again). If we try to twist before or after the skis are flat to the snow and they are still on their sides (edged), the skis will be stuck and either keep going the same direction they were or we will have to resort to some powerful body movement to change their direction with the result that we lose options for fine-tuning their subsequent course. Often at the crossover we combine the steering movements when the skis are flat with later tipping, continuing the steering only to keep up with the amount of arcing the skis do because of the tipping. The crossover must be learned and re-tooled at all levels of skiing from beginner to expert. To not use the cross-over move is to limit your skiing ability to lesser accomplishments. To use it is to open the door to experiencing the pleasure of flight on snow. But it is a movement that a skier ultimately must decide to make on his or her own. Coaching and coaxing may help, but ultimately a skier must just do it. Like diving off the high board, however, one can work up to doing the move on tougher terrain by doing it first on easier terrain. Skiers should begin learning this move as they first begin learning to turn--in Level 1. And then it will be part of their skiing pattern.
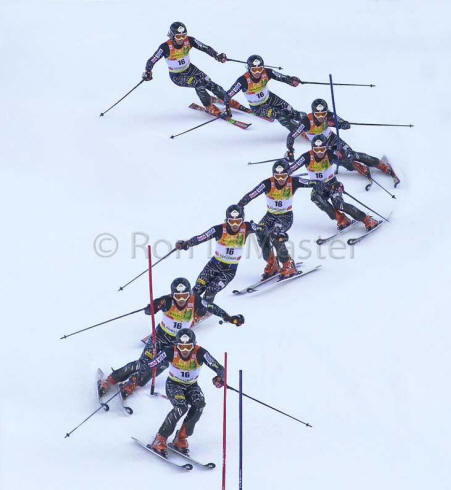
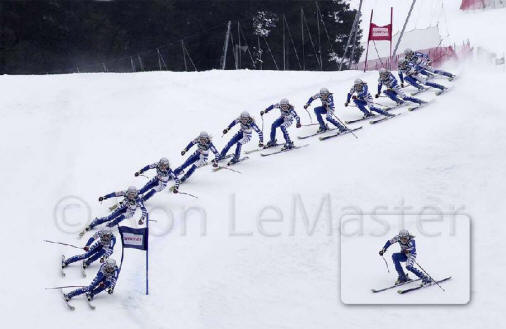
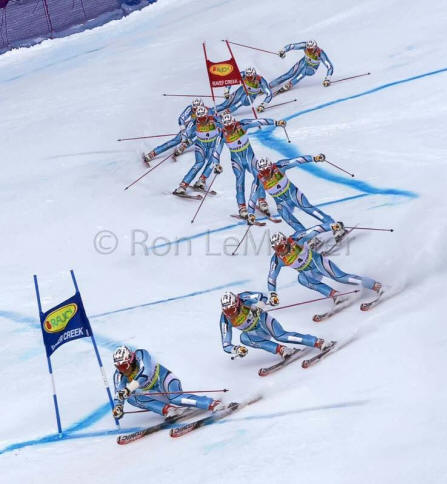
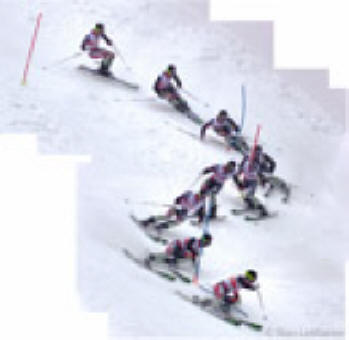
Turn phases are shown in this photo montage. Note especially the moment when the skis have gone flat to the snow and the body has reached the midpoint of crossing over them. You might note, too, how the racer's skis are at maximum tilt a bit higher in the turns than where we recreational skiers would do this--because we develop less force at our slower speeds. Neither would we ski with so much body tilting, but the images still apply to what we should do, just not so extremely. Thus the racer's legs are flexed at maximum rounding the gates and extended at maximum in between where the skis are flat to the snow. Finally, the hand position might be a bit confusing, especially at the zone where the racer is approaching the gates. This is different from what we recreational skiers do and has to do with creating a longer "float" time while the skis seek their new edges (you worked on this moment when you used patience to give the skis more time to come around the turn and reduced your tendency to quickly push the new inside ski forward). Also observe that the hands are always in front and held wide with the fist positioned so the poles stick out to the sides like whiskers; that works for us recreational types. Below are some more skiers' turns to analyze. See where the skis are flat to the snow, where they are tipped, and how the skiers have moved their torsos from one side of the skis to the other. Again, note hand-and-arm positions. Is the ski on the inside of the turn always ahead? In some cases the skiers are doing retraction turns instead of extension turns that are more common in recreational skiing and so their legs are not always longest at the crossover points. All these are from www.ronlemaster.com: exits, copyright by Ron LeMaster, used with permission. See his website for more and to order copies of his books.
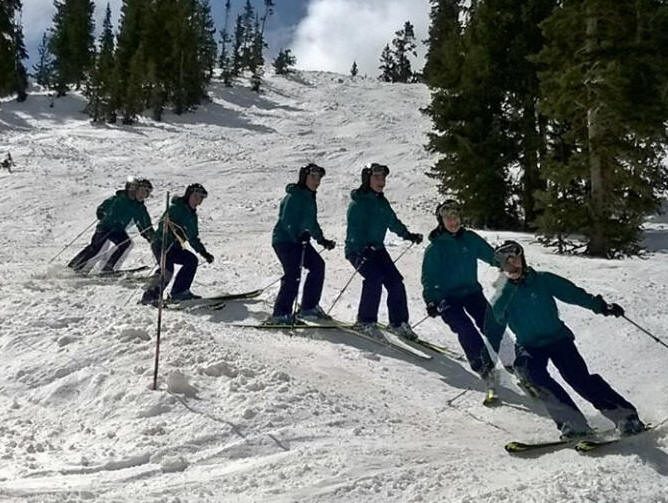
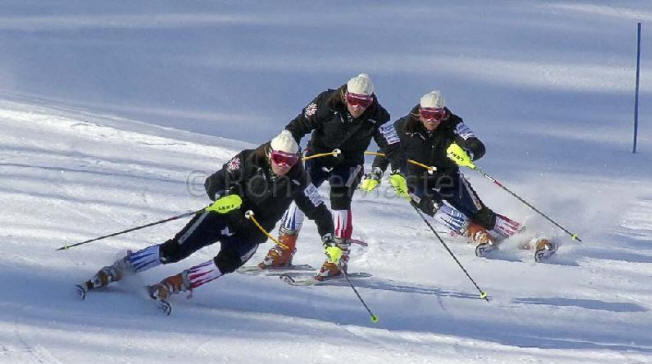
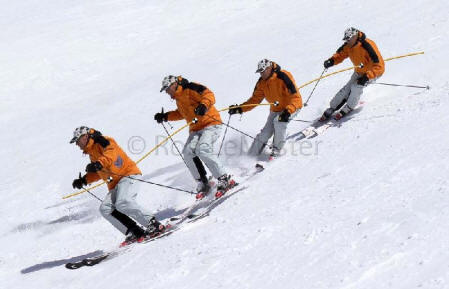
Edging Edging is the skill of tipping the ski. Edging allows the ski to bite into the snow in varios degrees depending on the angle of the ski base to the snow slope. This facilitates skidding in desried amounts or, because of the narrower foot area of most skis, allows the ski to bend under applied pressure so that it makes an arc in the snow around the path of which the skier will turn. Edging can be applied in various ways: by tensing the foot so the ankle and foot press against the side of the boot, at leat better holding the edged ski at the desired angle if not tipping it a bit. One can also move the knee sideways to tip the skis (note that to do so to a larger degree the knee must be bent). Or the upper legs (femurs) can be moved to the side underneath the pelvis. A combination can also be used. It has been argued that edging by tipping the legs below the pelvis produces the strongest effect, yet tipping from lower down might allow a quicker response if needed. Here are some good skiers. Note in this picture they do not create edging from the same body areas. The front skier uses more knee angulation; the lady on th right angulates more from below the pelvis.
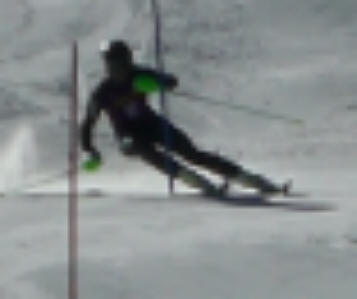
A Ski Turn Analyzed Enough with the hot shot skiers in the photos above. What about recreational skiers and how they do things?
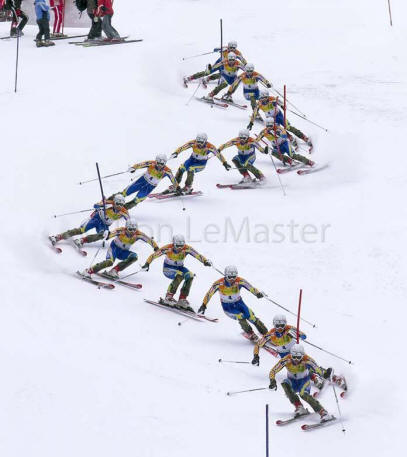
Above is a single skier making a turn. Starting from the top image (which is kind of blurred, so we'll call that 1-2) , the skier behind the pole is 3 and so on down to 7. What is the skier doing? In blurred image 1 and image 2 the skier is tipped forward and bracing with the straighter downhill leg, creating braking. This will impede entry into the next turn as well as tiring the downhill leg needlessly. In image 3 the skier (behind the pole) is still somewhat braced but has softened the downill leg a bit from the prior image; the ski's bases are still visible and the skis remain tilted on their uphill sides so the new turn has not started. The skier has not changed direction between image 1-2 and image 3. By image 4 the skier has started rising but is rising straight up instead of toward the inside of the new turn. Too, the downhill leg is still straighter than the uphill leg. The downhill ski's tail is in the snow and its tip is mainly out of the snow. Because of the direction the skier chose to rise, her "aim", the downhill ski has not yet been flattened to the snow but the uphill ski has been and the skis are in a V, no longer parallel. The skier is rotating the outside of the body around the inside, using the downhill ski tail to sort of anchor the turning as in a fulcrum. Thus the outside ski will run ahead in the turn at this point (see next image 5) whereas the inside ski should be ahead here. Still, she rotates not so much as most skiers do and ends up at image 6 in a fairly good stance for power. At image 5 the skier's skis have shot forward and the skier has either moved back or has been left behind in the turn. See the position of the thighs, pointing backward and with the hips well behind the boots. The downhill ski has now gone flat to the snow but the uphill ski is already edged slightly. The inside ski has turned a lot more than the outside ski between image 4 and this one; they should have turned much the same. At image 6 the skier has nicely angled the torso against the legs but not enough to keep the pressure on the two skis the same. If the inside leg were shortened, more pressure would go to the outside leg and ski. The leg shafts are fairly parallel but still the skis are farther apart at the boots than the legs are apart at the knees, causing the skis to head in diverging direction. At image 7 the skier has lost the angulation started in image 6 and is in sort of a bracking position to manage the forces developing at the end of the turn. Depending on those forces and her strength she might be better off having her shoulders tilted parallel to the slope instead of as they are. It's hard to tell if she has more weight on her heels here, depending on the turn's forces, but her outside ski has bent, tending her to turn uphill but perhaps more than she wants at this point. At image 8 (if there was one), the skier would hopefully have already started shortening the downhill leg to get into the new turn soon. Solution to create a gliding turn: Shorten the downhill leg at image 1 and 2 and then keep it short until image 7 when the new downhill leg will be shortened to start the next turn. Simple to say. Is skiing with efficient technique complicated? Not really. It's just hard to do. But then why did not the skier move in a way that would have been more effective? Prior to images 1 and 2 she had picked up speed having just been in a phase in the prior turn when she was pointed downhill, accelerating. Perhaps not wanting to carry that extra speed into the next turn, she braced to skid the skis and cause friction to slow her up, bracing with that stiff downhill leg that however kept her from entering the next turn cleanly and in a way she could have had the skis turn in a wider arc (which would have slowed her, too) than she got with her method. That wider arc likely would have kept her skis going at the same speed and not accelerating, smoothing out the forces on her and making them easier to manage. The root cause of this technique may therefore be apprehension, or fear. Such fear may have become implanted by getting onto slopes that gave too much acceleration to her turns prior to her learning the technique to better cope with acceleration and learn how to manage it. Compare the skier's hand and arm position with the ones of racers in the photos seen earlier on this page. Note how her hands are lower and not out to the side as much, thus compromising her ability to balance and also reducing tension on her core muscles she might otherwise have had, as the racers have done. But her stance overall puts her body in a position in which she could alter he movement patterns slightly and make her skiing more efficient. But her hands/arms positions are much better than that of most skiers. She is not a bad skier, as the terrain looks a bit challenging, doesn't it? But could she do better without too much time and effort? Likely. And if that pole in the picture is part of a race course she might win the race or win it better. "How many psychologists (or ski instructors) does it take
to change a light bulb (or a skier's turns)?", asked a wag. "How many ski instructors does it take to screw in a light bulb?", asked
another wag.
Another version (by those who already know how to ski and
may have some disdain--or jealousy--for instructors): "How many ski
instructors does it take to screw in a light bulb?", asked the wag.  "SKIING
IS A SLIDING SPORT"--a skiing web manual: Skiing
Web Manual Contents Why Read
This Skiing Web Manual That First Skiing Lesson
A Little Skiing History
Motion in Skiing
Conventional Skiing Wisdoms
Skier Excuses Fear
in Skiing
Conditioning for Skiing
Equipment and Technique
Skiing Equipment
How Skis
Work
How to Develop Balance on Skis
A SKIING
TURN SIMPLIFIED
The Final Skiing Skill: pressure management
Tactics for Terrains and Snow Textures and Racing
Skiing Tips and Tales--a potpourri
Exercises for Developing Skiing Skills
Children and Skiing Age
and Skiing
Gender & Skiing Culture & Skiing
Skiing Ethics and Slope Survival
Slope Safety Skiing
Environment Glossary Acknowledgements
SkiMyBest Website Contents "SKIING
IS A SLIDING SPORT"--a skiing web manual: Skiing
Web Manual Contents Why Read
This Skiing Web Manual That First Skiing Lesson
A Little Skiing History
Motion in Skiing
Conventional Skiing Wisdoms
Skier Excuses Fear
in Skiing
Conditioning for Skiing
Equipment and Technique
Skiing Equipment
How Skis
Work
How to Develop Balance on Skis
A SKIING
TURN SIMPLIFIED
The Final Skiing Skill: pressure management
Tactics for Terrains and Snow Textures and Racing
Skiing Tips and Tales--a potpourri
Exercises for Developing Skiing Skills
Children and Skiing Age
and Skiing
Gender & Skiing Culture & Skiing
Skiing Ethics and Slope Survival
Slope Safety Skiing
Environment Glossary Acknowledgements
SkiMyBest Website Contents This "A SkiingTurn Simplified" page last modified April 11, 2024. Did you come here from a link on another website? For latest version of this page, copy to your browser: http://www.SkiMyBest.com/skiturns.htm. Copyright © 2016 William R Jones. |
|

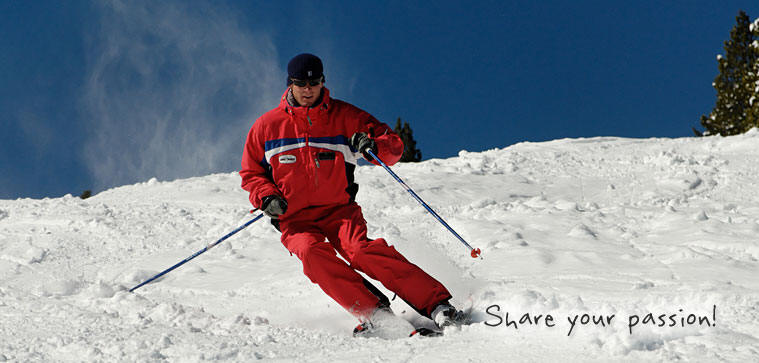
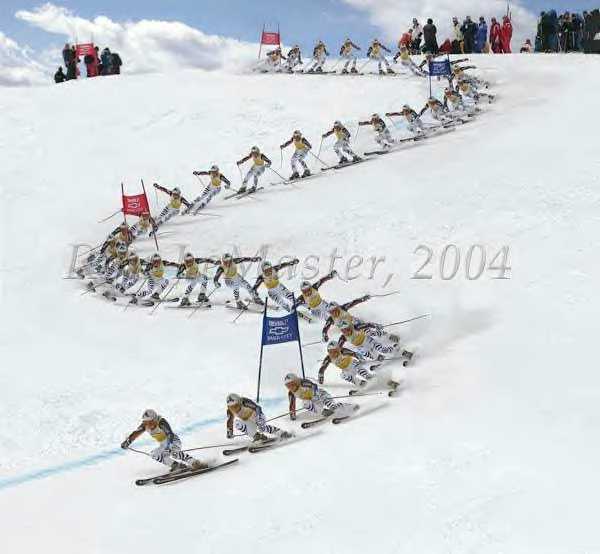 photo from
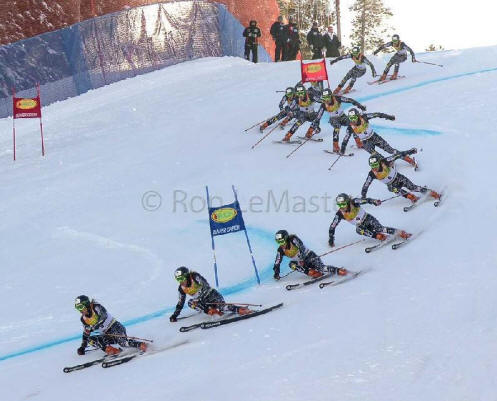
 the crossover
 an
extension turn
an
extension turn 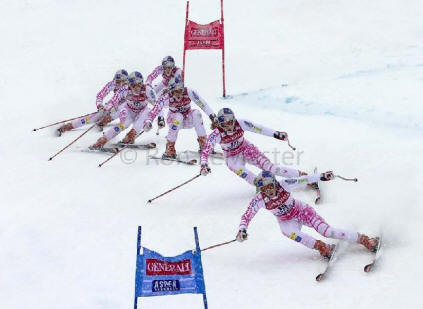 a retraction turn
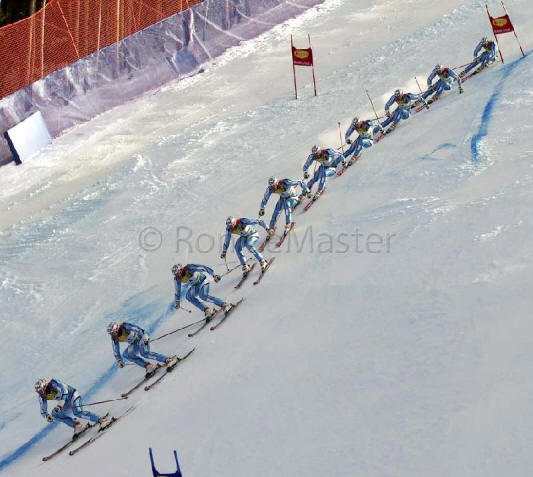
 outside knee
angled, hip angled, legs parallel, skis tipped same--Riley Plant, 2014
outside knee
angled, hip angled, legs parallel, skis tipped same--Riley Plant, 2014